Installing Window Glass
In an earlier section, I had talked about our difficulty installing the window glass. As a result of all our mistakes, we ended up cracking the window on the passenger side. This gave us the chance
to learn from our mistake and record for posterity what we did learn.
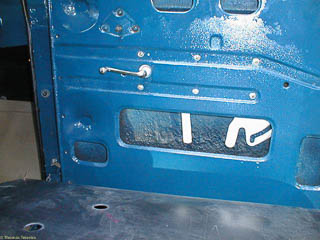
Here we are at the beginning, getting the window regulator positioned wound all the way down. This is a picture of the right hand door, with the front of the truck to the left. When you install the regulator in the door, make sure
it is oriented with the straight arm toward the front and the curved arm in the back.
If you're actually replacing your window glass, we're starting in the middle: you would, of course, have to remove the old window first. But rather than the usual trick of telling you "installation is the reverse
of removal", you'll have to figure out how to remove the glass after reading this installation instructions.
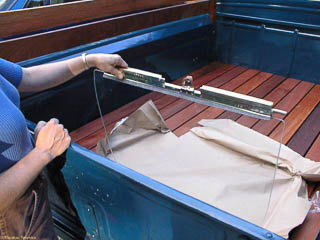
This is the new piece of glass. We're being somewhat cavalier with the glass here: it's just resting on the tissue paper in the wood platform insert we have in the back of the truck.
If you look at the enlarged view, you should just be able to make out the glass setting tape that has been folded over the top edge of the glass. This should have some cork as well as rubber as the cork will do a better job of
holding the channel in place. The cork just looks like speckles. The glass setting tape was available mail order from one of the many restoration supply companies. I'm pretty sure we got this tape as well as the new metal window
channel from Sacramento Vintage Ford.
We were able to get the channel over the glass by leaning heavily on the channel at one end, but had to take it out of the truck bed to do this. We've since heard that there's a special tool (there's always a special tool!)
that fits into the recess of the window channel that you can use to grip the channel and hammer it into place, so it's supposed to be difficult to get on. As I remember, we cheated and widened the channel a bit to get
it over the glass. This is not recommended, and it's difficult to keep the channel sides parallel, but I can't see that any of our difficulties were caused by that. You do want to make sure the channel grips the
window firmly, or the glass may not go down when you roll the channel down.
The other thing we worried about alot was the fore and aft positioning of the channel on the glass. You do need to make sure the ends of the window channel do not extend beyond the glass. As the window goes up, the slot in the
rear half of the regulator needs to slip over the knob in the middle of the channel. This happens as the window passes the half way point. Below that, the window can slide freely in the channel, but the mechanism will mostly
align itself. So you do need to make sure the channel and window are in place, but you can do this by eyeball or with a simple straightedge: no need to break out the laser measuring equipment or micrometer (unless of course
you really want to).
If you're good at doing those puzzles with two nails twisted and then tied into a knot, then getting the window into the door should be easy! The key thing is to turn the window glass sideways, and slide it down into the door.
Once it's down inside, you can rotate it into the correct position and make sure that the edges of the glass fit into the side channels at the front and back of the door.
The Dennis Carpenter catalog had some pictures of this process and advised that a helper might make things easier. That's my emphasis added, because although the window is heavy and a little awkward, there's
not really much room for you and a helper to maneuver back there.
What you're trying to accomplish is to get the window inside the door with the window channel lined up with the two control arms at the bottom. This picture shows the regulator just a little above the bottom: if you wind the handle
just a touch more, the arms will slip out of the channel altogether, but you can rest the window channel on the arms.
What you can't see in this picture is the springs and washers that hold the arms in the channel. Here is where it does help to have a helper: while one of you is trying to hold the window up and get the arms lined up, the other
can be ready to wind the regulator just a bit to engage the arms.
Now that you have the channel in place, you don't want to lose it! There's a threaded hole in the window channel, and you should have one large headed screw from your old window channel. If you don't, you can make do with a 10-32
machine screw and a stack of washers to accomplish the same thing. (this is from memory and only has a 10% chance of being the right size, but it is a readily available thread size). With this screw in place, the front
regulator arm won't be able to slide out of the channel into that blank space (hint: remember this for the "removal is the reverse of installation.")
Congratulations! The window is installed!
You probably want to add some lubrication to the window channel. We used some spray white grease.
This is also when you want to roll the window up and down several times making sure everything works smoothly: if it doesn't work now, it definitely won't work any better after you've put your interior trim back
on.
There aren't too many adjustments to make, which is both good and bad: good, because you probably can't mess it up too badly, and bad, because if it is messed up, there won't seem to be much you can do about it!
One adjustment is the regulator itself. It is held to the door by six screws (seen most clearly in the first picture). These screws are in slots in the door and you can slide the whole regulator forwards and backwards about a quarter
of an inch. Probably the easiest way to adjust this (assuming your window works well enough), is to wind the window all the way up, slide the regulator as far forward as possible, then tighten the screws. You'll notice that
the last action of the regulator is slide the window glass forward as well as up to make a good seal against the leading edge. Alternatively, if the window doesn't go all the way up, you
may need to slide the window regulator back, or you may need to take the glass out and reposition the window channel. Don't be too quick to do this though if the channel seemed to be lined up with the edges of the glass.
The other place where you're likely to run into problems doesn't have an adjustment per se, but has to do with getting the regulator to engage the knob in the middle of the window channel. You know how instructions
like these always seem to leave out one vital picture? Well, this is no exception! We didn't realize the importance of this when we had the camera out, and while we were figuring it out, we weren't in a mood to go get the camera,
so we'll just have to try to talk you through it. And no, I'm not going to take my door apart just now to get another picture!
Anyway, if the window gets caught half way up, you need to make sure that the knob in the window channel will engage the slot in the rear of the window regulator. If it doesn't, then either the knob or the regulator has gotten
bent some how. If you look down the inside of the door, you should be able to see if they are engaged, and whether the regulator looks straight or bent and take appropriate action.
Even though the window mechanism is old enough to be collecting social security, it should not require much force to operate. Again, tinker with it now, before you put any trim on (or back on).
This last picture doesn't really show much, except that we did apply some grease to the regulator when the window was near the top as well. It really does seem to be more important to get everything lined up, but the grease will
elminate the metal-on-metal sounds and keep the rollers rolling rather than scraping.
So how did it all work?
Well, I'm happy to say I continued to learn from my mistakes!
Within a couple years, both windows had cracks from somewhere, I think from forcing the windows when it had been binding on something. So last summer (2001), we got another pair of panes of window glass and some good advice from
a local glass cutter who also used to run a body shop and does some of his own auto restoration as a hobby. He was the one who told us about the special tool for installing the window channel, and making sure the setting tape
has cork in it. Plus he really emphasized the importance of making sure the mechanism works without binding.
What we found during this second (or third) glass installation was:
- One of the window regulators was loose in the door. This let the glass wiggle around and get caught on things: after you get the window working well, make sure you tighten the screws holding the regulator to the door.
- The other regulator was bent and didn't engage the window channel properly. This in turn had bent the window channel slightly, and eventually the window had fallen out of the channel. At this point, the window couldn't be fully
closed, or fully opened, and was a pain to remove.
- This same window had been binding because one of the bent metal brackets that holds the rear vertical window channel inside the door wasn't clinched down enough, and the rear of the window glass was catching on this bracket
and bending it out, as well as making some nasty noises. Luckily it hadn't bent the bracket so much as to break it.
So now we're at the start of a new year (well, springtime 2002), and the windows seem to work better than ever for us.
Once everything really seems to be working, you can install (or re-install) the trim: the liner inside the door, and the garnish molding inside the window. Since these hold the anti-window rattlers, you probably want to install
them before going on any test drives.


