Installing Dual Carburetors
Pretty much all the books on flatheads don't recommend more than dual carburetors for street use, and many of the newer books recommend putting on a four barrel carburetor instead of two carburetors. At the same time, two, three
or more carburetors were the only choices back in the 40's and early 50's. Plus the decorative possibilities for multiple carburetor setups are almost endless: air scoops, velocity stacks, various types of chromed and polished
air cleaners...
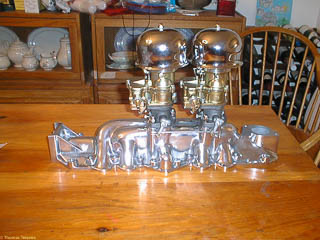
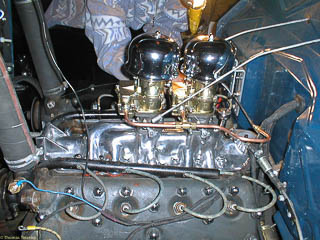
This is the intake manifold we installed with the carburetors and air cleaners set up inside before installation. I'll explain more about how we chose each of the major pieces and then what we did to install them.
Choosing the manifold
Some of the other trade-offs involve how and where to mount a generator or alternator. If the carburetors are put in the 'ideal' position (one centered over the front four cylinders and one over the back cylinders), the generator
will not fit in the stock location. Instead, the generator is mounted on a bracket attached to one of the cylinder heads. But some of the older intake manifolds (including the ones still manufactured by Offenhauser) also have
an option where the carburetors are closer together, both towards the rear of the engine to leave room for a generator.
We were already using an alternator instead of a generator and have quite a bit more room at the front of the engine, and had seen pictures in one flathead book of an engine with three carburetors and an alternator so we thought
that we might be able to install a 'super dual' intake manifold and completely satisfy my fetish for symmetry: alternator in the center of the engine instead of two one side, and carburetors centered over the appropriate cylinders.
So, we ordered an Offenhauser 'super dual' manifold (supposedly good for about 10% more peak horsepower than their regular dual), but the manifold we received did not have any mounting bracket at the front for a generator or alternator.
We knew a generator wouldn't fit, but some pictures of older manifolds in books showed the bracket anyway, and the bracket seems to be there for the triple carburetor manifolds: on engines from the late 40's, this bracket supports
the fan which runs on an idler pulley instead of on the generator.
While we weren't sure if we had just ordered the wrong version of the super dual manifold, briefly eyeballing the space available for the alternator made us nervous. we didn't actually take the alternator off and try the fit (particularly
since there was no bracket to fit it to), but decided to exchange the super dual for a regular dual: we were sure this would have a generator bracket and also we would be able to use the same manifold if
we decided to go retro and replace the alternator with a generator. Plus one manifold is specified for all the years 1932 through 1948 in case we ever decide to replace our engine with a 59AB block. Since then, we have seen
used Offenhauser super dual manifolds at swap meets that do have the bracket, but by then we already had a manifold.
We briefly considered getting a triple carburetor manifold, but decided against it for several reasons:
- Although all of Offenhauser's triple manifold had fan brackets, it still wasn't clear if the alternator would fit
- At 221 cubic inches (a little more since the cylinders have been overbored by about .050), it was questionable if two carburetors would be too much, let alone three.
- Carburetors are expensive. Even getting our old carburetor cleaned, rebuilt and plated to match the others would be expensive.
We found out later that the 'progressive linkages' for three carburetors tends to run the whole engine off one carburetor (the middle one) until you press harder on the accelerator. We did know that some people also install a block
off plate instead of the middle carburetor, or install the carburetor but don't connect the throttle linkage to it.
We also decided that while we were at it, we would get the manifold polished: the plain cast manifold looked okay, but not as shiny as our chrome alternator, the air cleaners or the carburetors.
Choosing the carburetors
This was an easy choice for us: Stromberg 97's, although it's perhaps hard to justify. One reason is that the Stromberg was the factory carburetor in 1935 (although the Stromberg 97 wasn't used until 1936). And since they're older
and rarer, there is more of a mystique to them. Of course, 'older and rarer' is another way of saying 'more expensive.'
The flow rates are better for the Holley 94's than for the Stromberg 97's and seem to be a better carburetor for a single carb setup: after all, Ford replaced the Strombergs with Chandler-Groves and then got Holley to manufacture
the Chandler-Groves design. But for a smaller engine, the smaller flower rates aren't a problem.
Anyway, while Holley carburetors seem very easy to find, it wasn't that hard to find some Stromberg's: both Hot Rod & Custom Supply and Red's Headers were able to locate some, and I've since seen them in Early Ford V8 Sales'
catalog, and heard about several other sources by inquiring on various mailing lists.
Choosing the Air Cleaners
Although scoops and velocity stacks look cool, we intend to do enough driving that we wanted real air cleaners. The small air cleaners, with or without louvers, look nice. Hot Rod & Custom Supply had some very tempting cast
aluminum lids for open air cleaner elements, but they also had these dome shaped Stelling & Hellings air cleaners (I've also seen them in Flathead Jack's catalog). They look even better in real life. We did spring for K&N
filter elements instead of the paper.
All the other parts
The intake manifold, carburetors and air cleaners are the big, expensive sexy parts. But not the most important: you also need gaskets, fasteners, throttle linkages and fuel fittings and some of these are a little harder to locate.
We also ended up needing a new fan belt and a new fuel pump push rod. Here's the complete list:
- Driver's side throttle linkage for the carburetors
- Passenger's side linkage for the choke
- Fuel line fittings for the carburetors
- Carburetor gaskets and mounting studs
- Intake manifold gasket
- 1/4" copper line and a T fitting
- Studs for mounting the fuel pump stand to the manifold
- Gasket for fuel pump stand to manifold
- Some 3/16" brake line and compression fittings for the vacuum advance
- Fuel line fitting for the fuel pump that works with the carburetor fittings
- 57" fan belt (replacing a 58" fan belt with the stock manifold)
- 8.87" long fuel pump push rod
- Fuel pump stand, fuel pump, oil filler/breather cap (although we could have moved the old ones over)
- Throttle return spring and bracket
Some things we bought that we didn't end up using:
- Fuel block and fittings for 5/16" flexible hose
- Throttle and choke rods
We'd been told that using hard fuel lines between the fuel pump and carburetors is asking for trouble, particularly with copper. We originally were going to go with 5/16" flexible hose with a fuel block mounted on the firewall,
and ordered the right fittings for the carburetors and the fuel block but forgot that we would need one more hose barb to go from the fuel pump to the fuel block: this is an area where the catalogs could be of more help and
remind you that you will need one more fitting and that the stock fuel pump fitting is the same as the carburetor. Many of the catalogs steer you towards electric fuel pumps but even the ones with both mechanical
and electric fuel pumps ignore this fitting. We decided to stay with a mechanical fuel pump so we wouldn't have to do more wiring, wouldn't have to worry about a pressure regulator (the old carburetors can only take about 2psi
while electric fuel pumps often operate at 6psi), and wouldn't worry about things like an inertial cutoff switch for the fuel pump. If we were planning on drag racing or going out to the salt flats I'm sure that the fuel pump
is a limitation, but I don't expect to have any problems on the highways here.
The throttle and choke linkage are just the standard Offenhauser parts. They may look a little clunky with cotter pins everywhere holding things in place but they are functional. Most of the fancier linkages have progressive mechanisms
for three carburetors and are a lot more expensive. There are also some fancy ball bearing plain linkages too. Maybe next time. Red at Red's Headers advised that the choke
might not be needed with two carburetors, but this is New England, not California, and we wanted to be able to use the truck in early spring and late fall so we got the choke linkages installed on the carburetors and also a
linkage to connect both chokes to the choke rod into the cab.
We could have moved our current fuel pump and fuel pump stand over to the new carburetor, but we happened to see NOS replacement fuel pump and a restored fuel pump stand at a swap meet so we bought those.
Removal of old manifold and installation of new manifold
This was all pretty simple. We completely removed the alternator to make the old manifold lighter and to get better access. Disconnected the fuel line from the fuel pump to the firewall (we had a can ready to catch any gas that
was ready to drain back, but there wasn't much to speak of). Disconnect the choke rod, throttle rod and accelerator pedal from the old carburetor. There is also a 3/16" metal vacuum line that goes from the distributor to the
manifold (it actually is a vacuum brake rather than a vacuum advance, but it serves the same purpose of adjusting the ignition timing to compensate for engine load). Then we went to work removing the 20 bolts holding the manifold
down. The stock spark plug wire looms are held on by some of the manifold bolts and once they were removed we just moved the wire looms off to the side and lifted off the manifold, complete with carburetor and fuel pump.
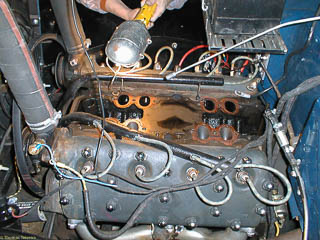
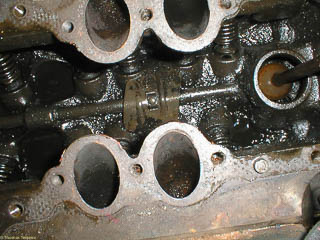
The left hand picture shows the engine with the intake manifold removed but the gasket still in place. The middle picture shows the front intake ports and valves and the yellow arrow points to the oil pressure relief valve. Since our oil pressure
is way too high when the engine is cold we removed this and checked the spring which had been stretched some. Although we tried to compress this back, the oil pressure is still too high when cold, but settles to a reasonable value once
the engine is warm. The right hand picture shows the rear intake ports and also the push rod which operates the fuel pump.
The repair manuals always say "installation is the reverse of removal", and this is all that has to be done. We put some high temperature RTV on a new gasket, put the gasket in place and then put the new manifold and carburetors in place.
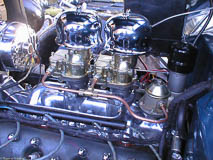
As you can see, we hooked up the choke linkage as well as the throttle linkage here. We ended up having to remove the throttle linkage though. The normal carburetor linkages don't have any provision for connecting this throttle rod, but we had
an extra ball joint that we put on the linkage. However, we didn't try to make any sliding arrangement so pressing the accelerator pedal would also try to move the throttle rod, definitely a bad idea.
You can also see that we used 1/4" copper fuel lines between the fuel pump and the carburetors. We have been told that this isn't a good idea since vibration will cause copper to harden up and eventually crack. I'm not sure how much of a problem
that might actually be since the fuel pump and carburetors are all mounted on the manifold, but it would be a very bad idea to use copper or any metal pipe all the way to the fuel line on the firewall. Most of the replacement stock fuel lines
from the fuel pump to the carburetor are copper although originally they were copper plated steel. We do have some 1/4" steel brake line that we will use to replace the copper at some point. We originally were going to use flexible hose to
a fuel block on the firewall, but thought that some sort of hard lines between the fuel pump and carburetor gives a cleaner look.
The intake manifold bolts get tightened down working from the inside towards the outside and some of these bolts hold down the spark plug wire looms. The only problem here is that one of the bolts has very little clearance and a normal socket
won't fit over the bolt, and there isn't room to use an open end wrench or even a crow's foot because of the write loom. We got an internal hex-head cap screw since there is room for an Allen wrench. I guess this means that the hex head manifold
bolts from Flathead Jack aren't just for show.
You can also see in this picture that the fuel pump isn't in place yet. This turned out to be our biggest mistake, or rather not getting the right size studs in advance was a big mistake. We could have moved the old fuel pump and stand over and
probably would have moved the studs over. Instead, we got an NOS replacement fuel pump and a cleaned up fuel pump stand at a swap meet. But we had lots of problems getting the fuel pump stand attached to the manifold. The threads in the aluminum
manifold are quite soft, and unfortunately the Offenhauser manifold has very shallow holes here. So shallow that 1-inch bolts were too long but 3/4-inch bolts were too short and stripped out the top part of the threads. It was also difficult
to find studs that worked. These were also on the short side (1-1/4 inches) and needed to have the coarse threads (going into the manifold) to be quite short or the fuel pump stand bolts wouldn't tighten down.
By using the wrong bolts and studs and being impatient, I ended up stripping one of the holes. Rather than taking the manifold off and getting a helicoil put in, I used loctite epoxy putty to hold the stud in (after two unsuccessful attempts,
I finally forced myself to wait a full twenty four hours for it to cure before trying to tighten down the bolts). If I were to do this again I would probably drill the holes all the way through the manifold so the length of the studs wouldn't
be so critical (the stock manifold has through holes).
We also discovered that we had to get a longer 8.87" fuel pump pushrod. The catalogs say these are for cast iron intake manifold, but the Offenhauser intake manifold is taller in the back. I was able to drive to PV Antique Ford in Tewksbury over
lunch rather than waiting for another mail order delivery.
These pictures show the fuel pump in place. They also show some 3/16" steel brake line which I used to connect the vacuum brake on the distributor to the vacuum port on the intake manifold. For some reason the Offenhauser regular dual only has
a single vacuum port that would normally be used for windshield wipers although several of the super dual intake manifolds I have seen in catalogs and at swap meets have two vacuum ports. Since we replaced the vacuum wiper with an electric
motor we didn't need to make any sort of Tee fitting.
After getting the manifold bolts tightened we put the alternator back. In order to get enough tension on the fan belt we had to have the bracket very high in the slot. For reasons we still don't quite understand, we had had to get a longer fan
belt last year when we put in the alternator (58" instead of 56"). We tried the stock fan belt but it was still too tight, so we ordered a 57" belt from NAPA which arrived the next day. The 57" belt seems to be "just right."
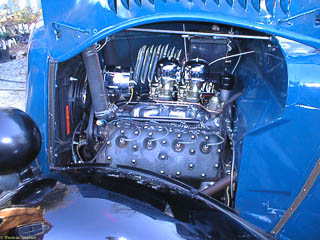
These pictures show more of the engine compartment. I'd perhaps like to find a place for the battery. Maybe a 1940 Ford battery tray would let the battery stay under the hood (instead of under the floor), but lower down and out of the way.
How does it run?
Except that we had to crank the engine for about a minute because it was a new fuel pump and empty carburetors, the motor fired right up. It didn't take much choke, but the carburetors seemed to be set up to run as singles and needed to be
leaned back quite a bit. I think the idle may still be on the rich side.
I got a Unisyn to try to balance the carburetors, but at idle there isn't enough downdraft for the Unisyn to work. I tried to balance them using my hand to gauge the airflow, but realized maybe I should balance them off-idle and then lower
the idle speed.
I had used "California Bill's Ford Speed Manual 1952 Edition" reprinted by Fisher Books as a guide to the jet size. He recommends .046 jets for 1932 to 1948 engines, but was probably talking about 239 or even 255 cubic inch engines. Our engine
seems to be bored .050 over so it should be about 228 cubic inches. Red of Red's Headers told me that .042 would probably be better, but suggested see how it actually runs first. I may
just take it to the local garage with a flathead expert since my house has too much 30 mph driving between here and the highway to get a good reading on the plugs at home.
Overall, it does seem to have a little less oomph at 30 mph in third than it did with the stock intake and dual exhausts, but it does just fine on the interstate accelerating to an indicated 75 mph. I have 3.55 gears and stock wheels and tires,
but the speedometer gear has 19 teeth instead of 18 and I don't know how accurate the speedometer is anyway.
Changing Jets
I did eventually get around to trying some .043 jets since going from .046 to .042 seems like a big jump. When I got the jets out, I discovered that the carburetors had come with .043 jets. About a week later I got some .042 jets and put them
in. I haven't really checked to see if the gas mileage improved, but there seems to be some hesitation at half throttle. I still need to check the timing and the vacuum brake before going back to the .043 jets.
When I was playing around with the jets, I did put in some steel fuel line made from 1/4" brake line. I also replaced the stock jet plugs with some hex head plugs from Flathead Jack. These are much easier to get snug then the slotted plugs.
Maintenance
While this never seems to be a planned activity, after we had the truck for three years, we've had plenty of it to do. Follow the link to see brake repair, carburetor rebuild, and some general fussing around.

