Rebuilding and Installing a "1939" Transmission
We'd been having trouble with the transmission popping out of second gear when going down a steep hill, plus having to double clutch, even when shifting between second and third. Ford's mechanics manual for 1932-1936 talks about
the popping out of gear problem and relates it to the shifter mechanism. Talking with people at swap meets said we should get a 1939 transmission because it already had better detents.
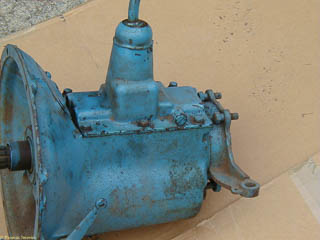
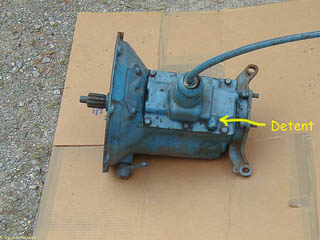
This is the transmission we ended up getting. Looks like a 1939 transmission, or at least the shifter looks like a 1939, as does the rear mount. The second picture shows the casting boss for the extra detent (click on the
image to see an enlarged view in a new window).
The shifter worked nicely -- definite "snick" as it went between neutral and second or neutral and third. Everything seemed OK, but we figured that we should get it replaced, or at least the bearings replaced, before putting
in the truck. And also do something about the blue color. We're not fanatical about restoration, but the early 60's Ford blue wasn't going to look right, even if the transmission is hidden.
The other way to identify the proper shifter is the part number. Ford part numbers then used a prefix which was the model number for the year the part was first used followed by a number for the part. The first digit or two of
that number indicated whether the part was used on the engine, the transmission, or wherever. The 81A was from 1938, although Ford didn't actually use these shifters very much until 1939 since they hadn't used up all the older
parts yet. Ford wouldn't change the part number just for the sake of numbering unless the part itself was changed. This shifter was used on pickup trucks through the 40's, even though most cars went to column shifters starting
around 1940.
Transmissions were not anything I'd worked with before, aside from figuring out how to get the shifter back into place after it slipped out of the second-third gear shifter fork. So we brought the transmission to our local mechanic,
the one with several flatheads of his own. But between one thing and another, he never was able to find the time to time to work on it. Chris, who had sold us the transmission in the first place, offered to help us out rebuilding
it. So, we retrieved the transmission and got to work.
Disassembly
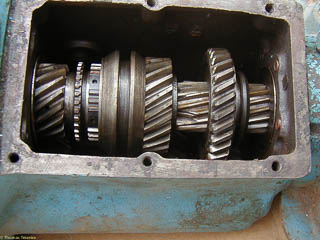
Step one was easy enough: remove the six bolts on the shifter cover and remove the shifter. In the enlarged view, you can see the main parts of the transmission: there's an input shaft on the left and an output shaft on the right.
The gear on the input shaft engages a cluster gear which is below, out of site. The synchronizer sleeve slides back and forth to engage second gear (as shown here), or to couple the input shaft and output shaft directly. With
the sliding gear in neutral, the sliding gear engages either first gear or reverse.
Anyway, the bad news started here. This synchronizer is not from 1939 which has separate brass synchronizer rings, and these "modern" synchronizers are the main reason 1939 transmissions are so popular. The clutch
release lever should have been a warning as well. The 1939 clutch linkage looks different.
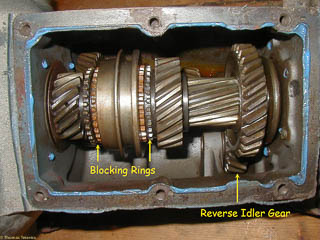
The 1939 synchronizers really are the same design as used in today's manual transmission, and the exact part was used by Ford at least through the mid 1960's. Aside from being cheaper to replace worn synchronizers, the modern "blocking
rings" actually prevent shifting into gear until the gears are synchronized which prevents wear on the synchronizer teeth. You can see the separate blocking rings in this picture of some 1939 transmission gears.
I was hoping to get some pictures of the transmission being taken apart gracefully, and succeeded in getting a few of these, like this of me removing the bolts on the front bearing retainer. The throw out bearing has already been removed and
is sitting in front of the transmission. This is as far as I got with the graceful method!
There are some pretty good descriptions of how it's supposed to work in a reprint of Repair Manual. Transmissions, Clutches, Overdrives, and Power Take-offs.1932-1947 and also in the reprint of Ford Shop Manual., 1939-1948.
In these, you remove the rear bearing retainer (also used as a rear transmission mount) and the front bearing retainer, remove a locking pin from the cluster gear shaft, drive the cluster gear shaft out of the case which allows the cluster
gear to fall the bottom and lets the input shaft come out the front.
All well and good, but to get the front bearing retainer off, you really need to rotate the clutch release fork all the way forward and out of the way. And on an older transmission, the clutch release lever hits the transmission bell housing,
as I discovered right after removing these bolts. So you have to drive the pin holding the release lever (outside the case, not visible in this picture) onto the clutch release shaft. I don't remember why, but I also ended up removing
the pin holding the clutch release fork to the shaft and driving the clutch release shaft out. I think I did this since the clutch fork still caught on the input shaft: the whole transmission had turned into one of those annoying 3D puzzles
where nothing comes completely apart!
I must have gotten the cluster gear shaft removed somehow, because I do remember that while I was pounding on the clutch release shaft, the main shaft came out through the back of the transmission case and allowed the input shaft to come
out as well, and by the time I got the clutch release shaft apart, the rest of the transmission was completely in pieces.
I could tell the front main bearing felt "crunchy", and while it might have been possible to clean it, I figured it was more sensible to replace that bearing. V8Chris also advised replacing all the bearings, the bushings for the clutch release
shaft, and the cluster shaft and reverse idler shaft. The gears themselves looked worn, but no broken teeth, and not excessively worn.
The manuals said to press the bearings off. Great, but we don't have a press. Should have just found a machine shop to press the old bearings off, but instead got Chris to help out. One piece of advise from the net had been to just slam the
front of the input shaft down on a heavy metal plate or vise, and let inertia work. No such luck: Chris ended up using an acetylene torch to heat the bearings up and then drive the shaft out in a vise. Crude, but effective.
Putting bearings back on is easier: heat the bearings in an oven and they'll expand enough to slip right on. We overdid it some and heated the bearings to 450, enough to get the machining oil to brown. And we got one last visit from Murphy
as we found we had two rear bearings and no front bearing. When we did get the bearing, heating it for 20 minutes in a 350 oven was more than enough to get the bearing to slip on.

